BELTBOX: Vocal Dampener for Singers, Actors, Performers, Stress Relief. A Portable Warm-Up Room! Gift for Singers!
FREE Shipping
BELTBOX: Vocal Dampener for Singers, Actors, Performers, Stress Relief. A Portable Warm-Up Room! Gift for Singers!
- Brand: Unbranded

Description
This is the easy part. Simply hook the meat, making sure it doesn’t touch any part of the box. Put the lid on, start the fan and wait. Easy, right? How to tell when it’s done I then added another 6 x holes using the same 13mm spade bit at the top of the box, these are along the top of the box. I then attached the fan at the bottom. The way it works is the bulb heats up the box and the fan blows air into the box, the air flows up through the meat and out of the holes at the top. I made sure that the fan was facing the right way, and blowing air into the box rather than pulling it out. I wired the PC fan into an appropriate plug, but make sure to read up on what power you fan needs. I have seen a few people use a USB powered fan which should help take out some of the guess work if you are unfamiliar with electrics. If you look closely, you can see that one of the panels has a number 1 on its side, indicating the top panel. The other panel with the plastic dowels is the bottom panel; let’s put aside the top panel for now. Let’s place the bottom panel in the center of our worktable.
So align your tape measure and place a dot at 17.5 cm or 6.89″. This will be the spot we’ll use to place our hole saw and drill the fan’s hole. Take the drill and align it on the first dowel point; drill slowly, as you don’t want to drill through the panel! Then, do the same for the other 3 indicated points. Now you can add the glass door to the cabinet by sliding it into the hinges. Take your flat-head screwdriver to gently secure the glass door with the screws on the inside of the hinges.
Make sure you see the measured and indicated spot from the previous step. Now we’ll take our drill, with the hole saw attached, and align the drill point with the measured spot on the panel. In some dry climates- indeed, like the highveld area of South Africa the Voortrekkers credited with inventing biltong were crossing- there would be no risk of this moisture gathering at all because the ambient moisture in the air is that low.
In other parts of the world (especially the tropics) you can have high ambient moisture, however, and this could be problematic for your biltong making. Light bulbs aren’t needed in most cases A wood drill for the dowels, a glue gun, a wood saw, some screws, a screwdriver, some measuring tools, a miter box, a scissor and a pencil, that’s all we need. So let’s get started. 1.3. Ikea Eket Make sure to cover the ventilation hole completely. Add some pressure to the fan to secure it. Feel free to add some extra glue to the sides. You can cut away the excess mosquito net when the glue is dry. 4. ADD SOME FLAIR 4.1. Add Led Strip
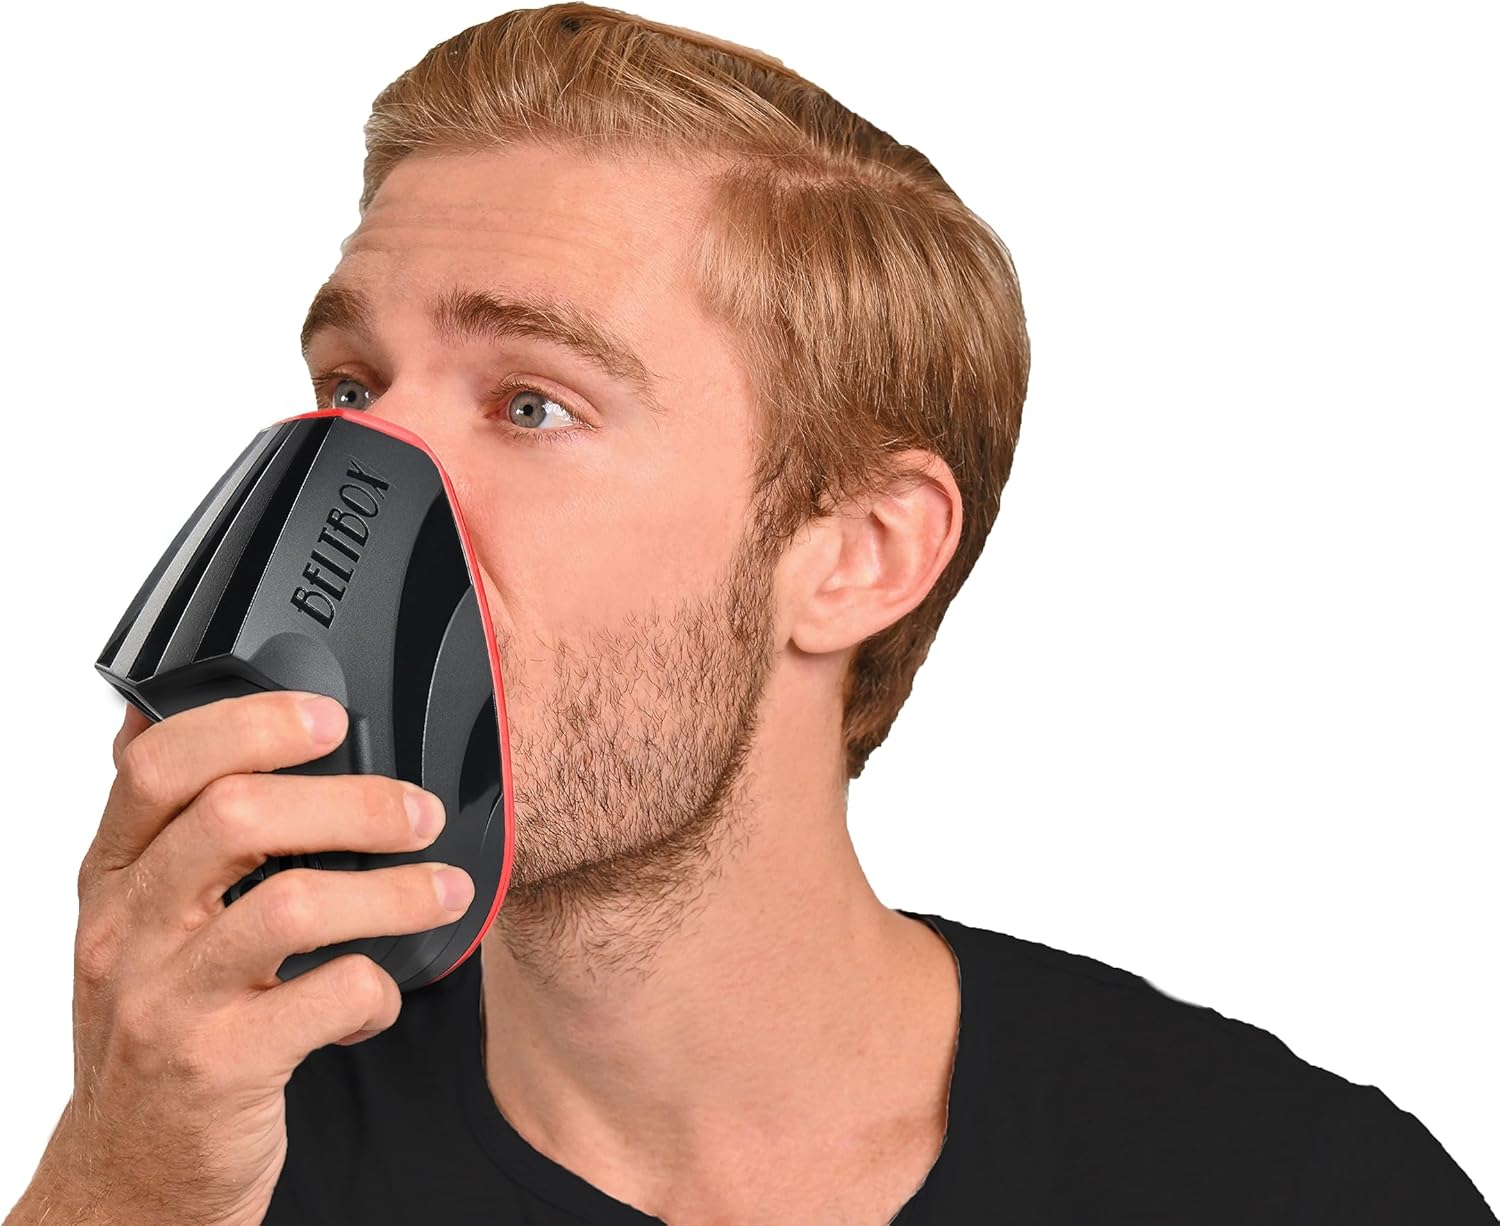
Sing Into A Pillow
At Meately.com, we designed a biltong box starting from an IKEA EKET cabinet. We’ll take you through all the steps in detail so that you can create one at home. The BELTBOX really does lessen the amount of sound that is coming out and possibly bothering others. This is the product's main function, and it delivers as promised, dampening the sound up to 30db.
Continue to do the same with the other sides, keeping in mind that the right side profile needs two sides miter sawed. And the left side profiles none. The first “BILTONG BUDDY” Home Biltong Maker was made of a powder-coated mild steel and many of those are still operating today! Place the left panel on the left side of the bottom panel and the right panel on the right side. In a later step, we’ll construct the cabinet by placing the left en right sides at a 90-degree angle on the bottom panel’s plastic dowels. Once this side is done, we let it dry and continue with the outside of the right panel. And finally, we will continue with the outside of the left panel. 2.8. Measure & SAW dowelsMake a biltong box from a cardboard box to save money. To easily make a biltong box at home, use a cardboard box, such as a computer monitor box. Choose a box with dimensions of about 60.7 × 60.7 × 91.4 cm (1.99 × 1.99 × 3.00 ft). Stand the box upright and open the flaps on top. [9] X Research source Once they are in place, you can position the left panel as intended, meaning at a 45-degree angle with the top panel, slide the left panel firmly into place by adding some pressure while holding the top panel in place. Biltong is an air-dried cured meat. Ideally, you will not apply any heat what-so-ever during the drying process, as heat destroys vitamins and will adversely affect the flavor profile of your biltong. Even a lamp bulb in the box carries a risk of ‘cooking’ the outer layer of meat. Biltong and jerky are not the same, and biltong is not heat processed at all. Instead of a succulent, properly preserved, and safe piece of biltong, you’ll get an unhygienic mess that will taste bad and could carry bacteria. If the whole piece isn’t coming out yet, don’t use force; turn over the panel again and gently drill from this side. Fun video: we also made a timelapse of biltong drying in our DIY IKEA box! 1. BUILDING NECESSITIES 1.1. Components
In the picture, we will attach the hinges on the left panel of the cabinet, as we placed the left side down on our table. I apply one of my bbq rubs, but choose whatever herbs/spices you have at home, or prefer. Apply the spices/rub, and leave it in the fridge (covered) for a few hours. You want to give the rub some time for the flavors to blend before starting to dry the meat. Hanging Luxury Cheese & Meats Letterbox gift hamper - with cheese, charcuterie, olives, salami, nuts - beautifully hand wrapped in parcel paper We’ll start measuring now; first off, we’ll start measuring 12 cm or 4.72 inches from the top; we’ll measure this distance on two different spots so we can align our tape measure to those spots. Then, using the tape measure, we will mark the three drill holes, which will be vital in the next step.Place the profile on the miter box and align your measured line with the straight saw guide. Now start sawing holding your profile firmly in place until you are through. Also, drill only halfway through the panel, as we’ll drill the remaining part from the other side. This is to have as least chipped paint as possible.
- Fruugo ID: 258392218-563234582
- EAN: 764486781913
-
Sold by: Fruugo